It is possible to track across multiple domains with analytics, for instance let’s say you have your main site (mainsite.com) and your shopping cart, reservation widget or countless other scenarios (othersite.com).
You can feasibly track everything that goes on within these two domains under one profile so that you can get all the attribution tied into one place.
To get started you will need to have the ability to access both sites or have someone that has access that can install code for you.
First thing first, sign into your Google Analytics account go to the admin tab then the tracking info tab under that, you should see something similar to this:
![]()
You will want to select multiple top-level domains from the radio buttons and then copy the code and put it your text editor. This is where you tweak it to fit your multiple domain website.
You’ll notice is there’s a couple of new items in the code:
- _setDomainName
- _setAllowLinker
Now add to the code, here’s the first trick to remember the domain you set refers to what site it’s actually going on. For instance the code that goes on your mainsite.com is set to “mainsite.com” and when you put the code on the other site you change that to reflect the root so it will be “othersite.com”
Here’s what that looks like:
 var _gaq = _gaq || [];

_gaq.push(['_setAccount', 'UA-xxxxxxxx-1']);

_gaq.push(['_setDomainName', 'mainsite.com']);

_gaq.push(['_setAllowLinker', true]);

_gaq.push(['_trackPageview', '/dynamic funnel tracking']);
There’s a few more steps, however before we get to those let’s talk for a minute about tracking dynamic pages like some shopping carts or lead generation funnels.
In the case of dynamically produced pages you would put something after the back slash to ID that page.
You can build an actual URL like /step_one.html or you can build it to simply be something like this /step1.
It makes no difference whatsoever just name it what you want and write it down so you can build a goal funnel with this later on.
Now for the second component of this set up you will need to link back and forth from the sites, that could be with an add to cart button a link or even a form.
When using a form you need use this piece of code inserted into the form:
<form name=”f” method=”post” onsubmit=”_gaq.push([‘_linkByPost’, this]);”>
When you’re linking to the othersite.com you need to use a different piece of code and looks like this:
<a href=”http://othersite.com/intro.html” onclick=”_gaq.push([‘_link’, ‘http://othersite.com’]); return false;”>Add To Cart</a>
Realize that if you’re on the othersite.com linking back to your mainsite.com you need to use something similar to the one above, however it has to have the right link in it and it will look like this:
<a href=”https://staging.interactone.com/wp-content/uploads/2012/10/catalog.html” onclick=”_gaq.push([‘_link’, ‘http://mainsite.com’]); return false;”>catalog</a>
Now that we’ve gotten through all the tags and what goes where we need to build another profile that will track all of your domains together, this way you will always have baseline historical data for your domains that you can refer to when setting up filters in your new profile.
Here are the steps to accomplish this:
- From the account home page of your analytics account select the account under which you want to add the profile.
- Click the Admin tab in the upper right hand corner of the page below the “my account’ settings.
- Then click on the desired profile
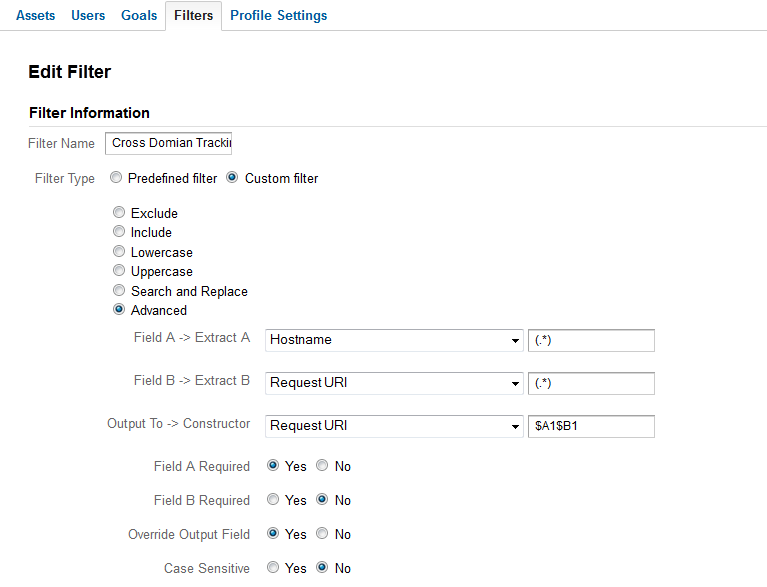
- Click on the tab that says filters and new filter and then set up your filter to look like the image below.

There you have it check back later for your data if you run into issues feel free to post your questions below.